

25 Easy Christmas Crafts for Kids on a Budget

Hey Mama,
I see you. Yes, you—the one juggling holiday prep, work, homeschooling, and somehow trying to keep tiny humans entertained without losing your sanity. That’s why I’ve created this little lifesaver of a guide: 25 Easy Christmas Crafts for Kids on a Budget.
The holiday season is magical, but let’s be real… It can also feel overwhelming. Between wrapping presents, planning meals, and decking the halls, it’s easy to feel like you’re running on empty while the kids are bouncing off the walls. By the end of this list, you’ll have 25 kid-approved crafts ready to go, along with a few clever tips for sneaking in a little calm and joy for yourself.
So grab a cup of coffee (or second cup, no judgment), put on some holiday tunes, and let’s make this holiday season fun, cozy, and stress-free one craft at a time.
Disclosure: This post contains affiliate links that are at no additional cost to you, I may earn a small commission. All Products are linked in Blue.
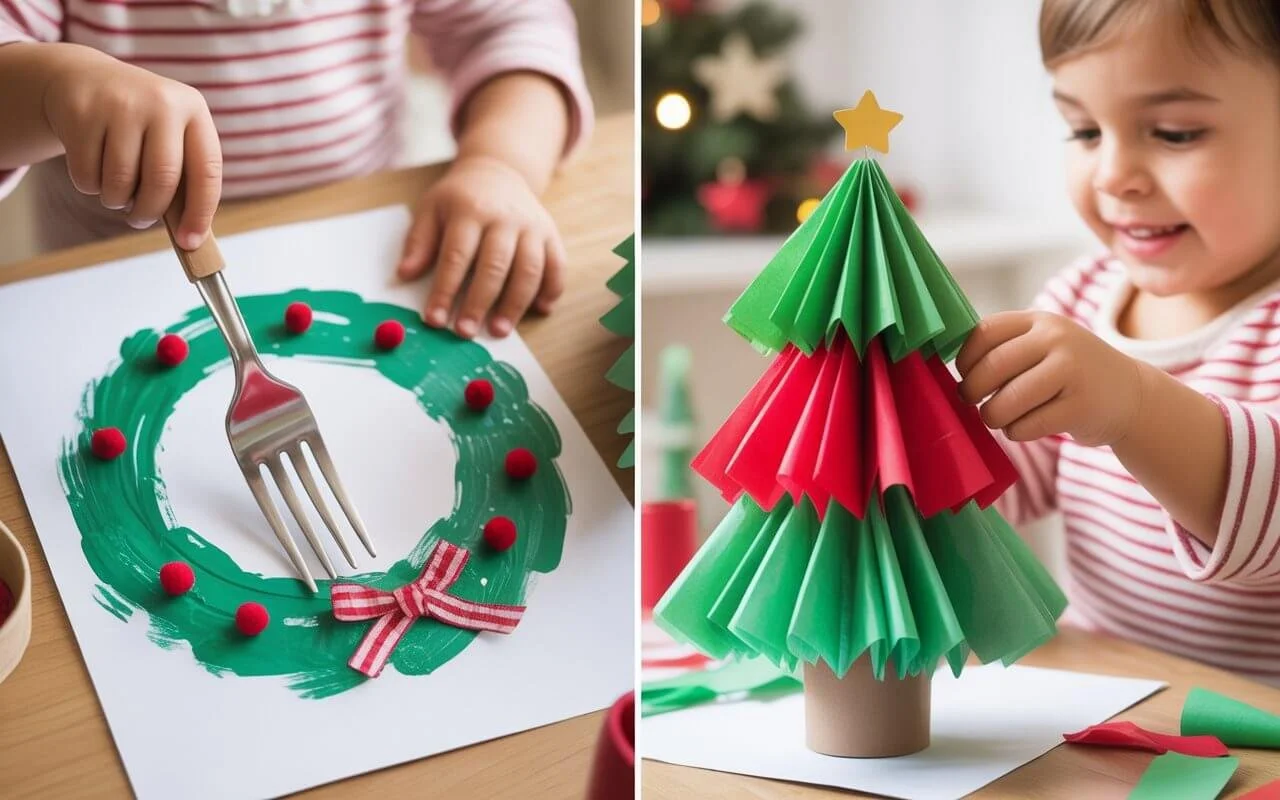
1. Fork-Painted Christmas Wreaths
Yes… with an actual kitchen fork. And it turns out to be so cute that you’ll want to hang it on the fridge immediately.
This craft is a lifesaver because it requires almost no setup, keeps little hands busy (so you can breathe for 5 minutes), and helps with fine motor skills. Plus, you probably already have everything you need at home.
Supplies You Need:
How to Make It:
Pour a little green paint onto a plate.
Have your child dip the fork into the paint and “stamp” in a circle to create the wreath shape.
Add red pom-poms or stickers as the berries.
Glue a small ribbon bow at the bottom.
Let it dry and hang it proudly like the masterpiece it is.
Why Kids Love It:
It’s messy enough to feel exciting but controlled enough that you won’t need a Christmas miracle to clean up afterward.
And as your kids are stamping away, you’ll feel that little spark of, “Okay, I’ve got this. We’re making memories today.”
2. Tissue Paper Christmas Tree
Mama, if your kids are anything like mine, they LOVE hands-on, colorful projects—especially when they get to make something that actually looks like Christmas.
This Tissue Paper Christmas Tree is perfect for toddlers and preschoolers. It’s simple, budget-friendly, and the kind of craft that doubles as cute holiday décor. You’ll love it, and so will they.
Supplies You Need:
Green tissue paper (or a mix of festive colors)
Scissors (kid-friendly ones for little hands)
Cardboard or a pre-made cone base
Optional: Star, pom-pom, or small ornament for the top
How to Make It:
Cut the tissue paper into small squares or rectangles. Let your little ones pick their favorite colors—this part is half the fun!
Apply glue to the cardboard cone or base.
Have your kids scrunch, fold, or layer the tissue paper onto the cone until it’s full and fluffy.
Add a star, pom-pom, or tiny ornament to the top.
Display it proudly—on a shelf, table, or as part of your festive centerpiece.
Why Kids Love It:
It’s colorful, tactile, and creative. They get to see their art transform into real holiday décor they can proudly show off.
💡 Pro Tip: Encourage layering different shades of green or mixing in red/yellow tissue pieces for extra depth and fun. Minimal mess, maximum festive cheer.
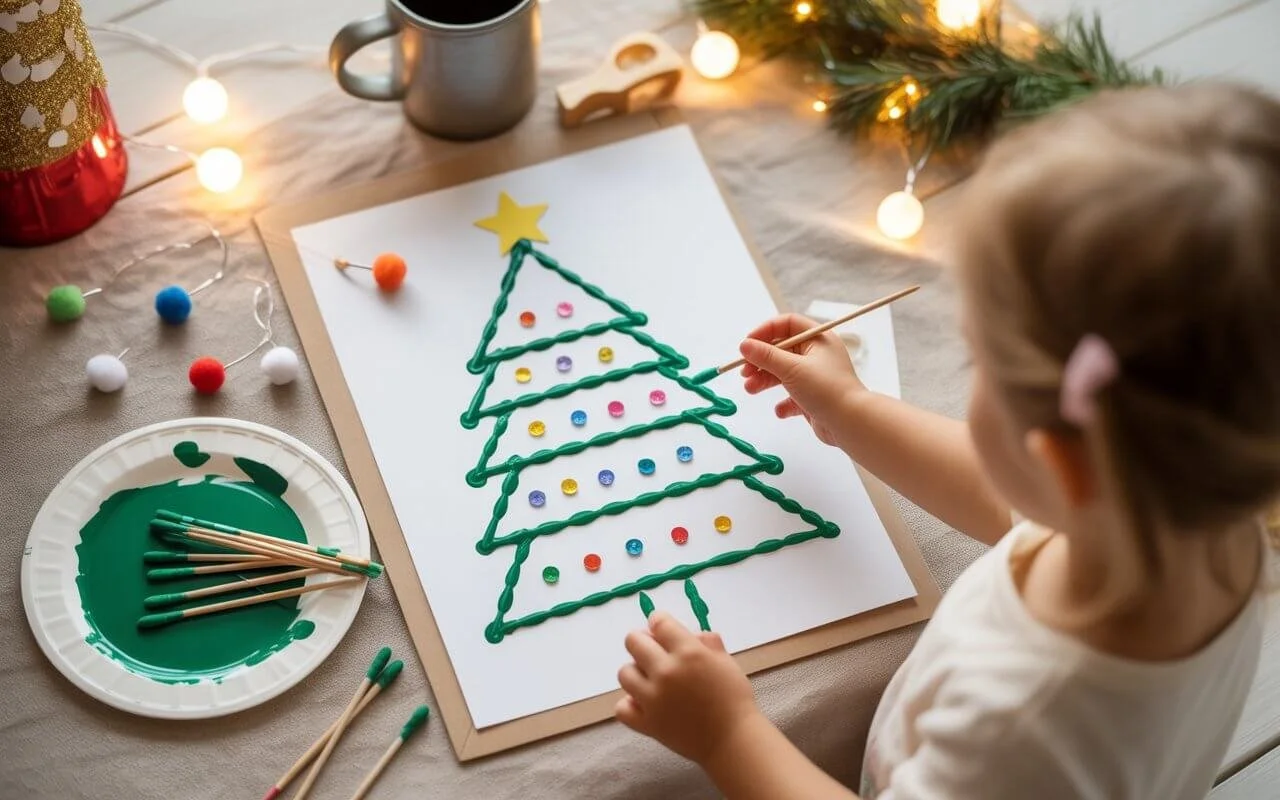
3. Q-Tip Christmas Tree Activity
Now, let’s talk about a craft that’s easy, affordable, and perfect for keeping little hands busy without overwhelming you with prep or mess.
The Q-Tip Christmas Tree is a classic that never fails. It’s budget-friendly, builds fine motor skills, and gives kids a sense of accomplishment when their tree turns out perfectly festive.
Supplies You Need:
Q-tips (cotton swabs)
White or colored cardstock
Pom-poms, sequins, or stickers for ornaments
Glue (optional if using stickers)
How to Make It:
Draw a simple triangle on the cardstock as the tree outline.
Have your child dip the Q-tip into green paint and dot along the triangle, filling in the tree.
Once the tree is filled in, add pom-poms, sequins, or stickers as ornaments.
Optional: Use a yellow Q-tip dot for the star at the top!
Let it dry and display your mini masterpiece.
Why Kids Love It:
It’s satisfying to dot and decorate, giving them control and creativity. Tiny Q-tips make them feel like they’re painting like a pro without the mess of big brushes. They can make a whole forest of tiny trees to gift, decorate, or hang around the house.
💡 Pro Tip: Turn this into a learning activity by counting dots, sorting colors, or creating patterns on the tree. Fun + educational = holiday win!
4. Tallest Marshmallow Snowman Challenge
Sometimes the holidays call for a little friendly competition and pure silliness—especially when your kids are bouncing off the walls and you need them entertained for 20–30 minutes.
Enter the Tallest Marshmallow Snowman Challenge: a craft that doubles as a game, a sensory activity, and a sugar-fueled smile generator.
Supplies You Need:
Mini marshmallows (lots!)
Candy for decoration (M&Ms, small gumdrops, chocolate chips)
A small plate or tray
Optional: icing or frosting to help with sticking
How to Make It:
Set out the marshmallows, toothpicks, and candies.
Challenge your kids to build the tallest snowman they can using only the marshmallows and toothpicks.
Use candy pieces for eyes, buttons, or a little snowman scarf.
Celebrate each creation—even if it topples over!
Why Kids Love It:
It’s hands-on and creative, letting them design their own edible snowmen. The friendly competition keeps them engaged and laughing. Bonus: it’s edible, so cleanup isn’t as scary, you might even get a snack in the process!
💡 Pro Tip: Take it up a notch by timing the builds or giving small prizes for the tallest, sturdiest, or most festive snowman. Keeps it exciting and replayable!
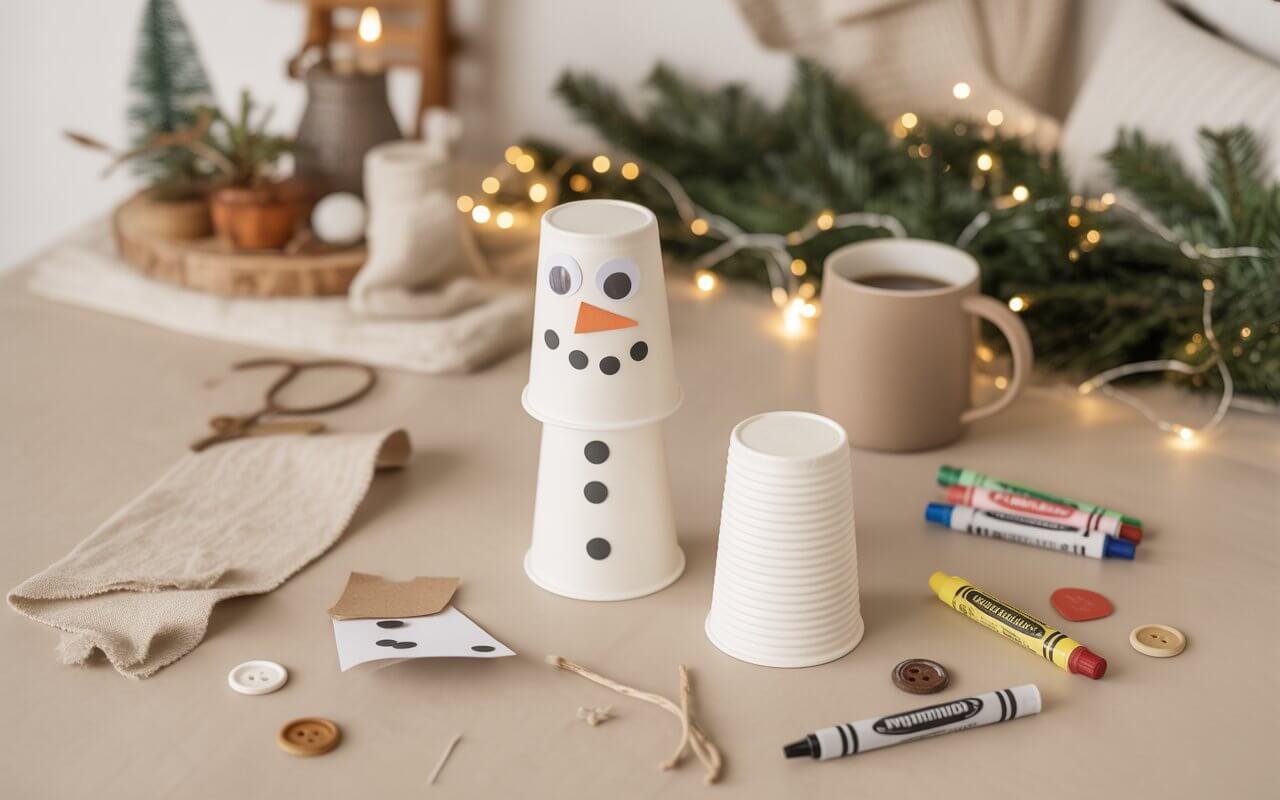
5. Snowman Cup Craft
Let’s be real, sometimes all you need are simple household items to keep the kids entertained and spark some holiday magic. This snowman cup craft is mess-light, budget-friendly, and adorable. Perfect for a quick craft session while you sip your coffee (or hide from tiny chaos for five minutes).
Supplies You Need:
Disposable cups (white paper or plastic)
Orange paper or foam for the carrot nose
Optional: small scarves (fabric scraps) or buttons
How to Make It:
Stack 2–3 cups on top of each other to make the snowman body (tape or glue works great).
Draw or glue on the eyes, nose, and mouth.
Add buttons down the front with markers, paper, or small craft buttons.
Tie a small piece of fabric around the neck as a scarf.
Optional: use a small paper hat or foam piece to top off your snowman.
Why Kids Love It:
Simple stacking makes them feel like little engineers. Decorating options allow for tons of creativity. Great for group activities or classroom parties
💡 Pro Tip: Line up a few cups and let multiple kids create their snowmen together — it turns a tiny craft into a mini snowman village. craft kits,
6. Cotton Ball Snowman Craft
This one is perfect if your little ones love hands-on sensory fun. Cotton balls feel magical to toddlers and preschoolers—they’re soft, squishy, and perfect for creating a snowy snowman without freezing your fingers off!
Supplies You Need:
Black and orange markers or felt pieces for eyes, nose, and buttons
Glue (washable works best!)
Optional: tiny scarves made from scrap fabric or ribbon
How to Make It:
Draw or print a simple snowman outline on cardstock.
Have your child glue cotton balls onto the snowman's body until it’s fully covered.
Add eyes, a carrot nose, buttons, and a scarf to bring your snowman to life.
Let it dry and display proudly on your fridge or classroom board!
Why Kids Love It:
Soft, tactile experience perfect for little hands. Easy to customize with faces, scarves, or accessories. Fun winter sensory activity without leaving a mess everywhere
💡 Pro Tip: Use different sizes of cotton balls to create a “puffy” 3D effect—it adds dimension and makes it feel extra special!

7. Potato Stamped Christmas Lights Craft
If you want a craft that feels like magic but takes almost no prep, this one’s for you. Potato stamping is a classic, budget-friendly activity that gives your little artists a wow moment when their Christmas lights come to life.
Supplies You Need:
Potatoes (cut in half to create stamps)
Washable paint (red, green, yellow, blue)
White or colored cardstock or construction paper
Marker or pen for stringing the lights
Optional: glitter for a festive sparkle
How to Make It:
Cut a potato in half and carve a simple shape (circle or oval) for the light.
Pour a small amount of paint on a plate.
Have your child dip the potato stamp in paint and press it onto paper, creating a string of Christmas lights.
Once dry, draw a black or green “cord” connecting the lights for a realistic look.
Add glitter or extra details if desired.
Why Kids Love It:
It’s messy enough to be exciting but easy to manage. Kids can repeat the pattern and experiment with colors. The stamped lights look like a real holiday string of joy when finished.
💡 Pro Tip: Use leftover potatoes for multiple colors—just cut a new stamp for each color to avoid muddying the paint. It’s a super satisfying way for kids to see instant results!
8. Christmas Handprint Cards
Mama, let’s be honest—sometimes the best holiday gifts are the ones that come straight from little hands and big hearts. Handprint cards are not only adorable keepsakes, but they’re also budget-friendly and perfect for gifting to grandparents, teachers, or friends.
Supplies You Need:
Washable paint (red, green, gold, or any fun holiday colors)
Markers or pens for adding messages
How to Make It:
Have your child dip their hand in paint and press it firmly onto the card.
Let it dry completely.
Use markers to turn the handprint into a reindeer, Christmas tree, or festive mitten.
Write a special holiday message inside: “Merry Christmas” or “Handmade with love.”
Add glitter, stickers, or ribbon for that extra festive pop.
Why Kids Love It:
Their hands become art, making them feel super proud of their creation. Minimal prep, but maximum excitement for them. It’s a gift that melts hearts and creates holiday memories you’ll cherish forever
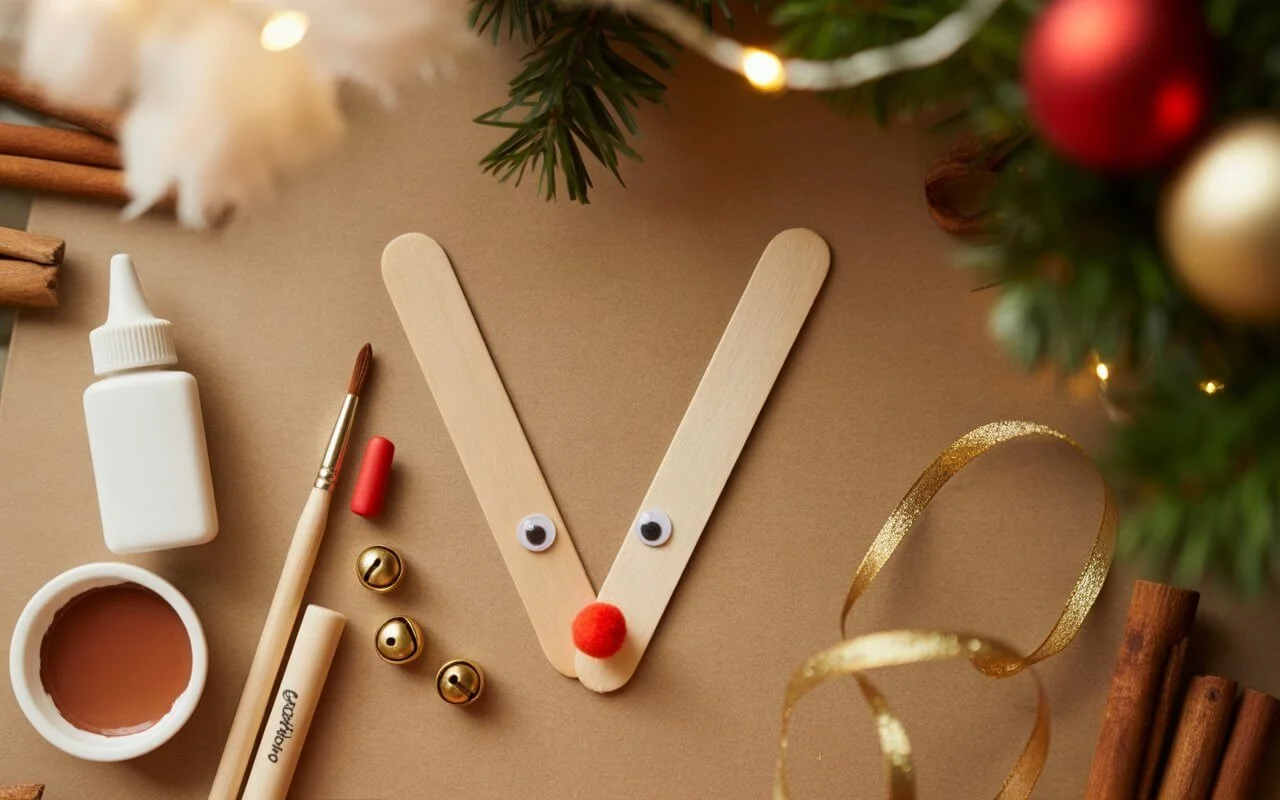
9. Popsicle Stick Reindeer
If you’re looking for a super simple craft that feels festive without turning your living room into a glitter bomb, popsicle stick reindeer are the way to go. They’re perfect for toddlers, preschoolers, or even elementary kids, and you probably already have most of the supplies at home.
Supplies You Need:
Popsicle sticks (plain or colored)
Optional: small jingle bells or ribbon
How to Make It:
Arrange 3 popsicle sticks in a triangle (or stack 2 for the body and 1 for the head).
Glue the sticks together and let dry.
Draw or glue on googly eyes and a red nose for Rudolph vibes.
Use markers or paint to add antlers, a mouth, and little hooves.
Optional: tie a tiny ribbon around the neck or glue a bell for extra festive flair.
Why Kids Love It:
Easy to assemble, which means minimal stress for you. They get to decorate and personalize their own reindeer. Perfect for holiday mantel displays or hanging on the tree
💡 Pro Tip: Make a whole reindeer family! Line them up on a shelf for a cute DIY holiday display. You can also use this reindeer craft kit for an easier setup, especially when you’re on a busy schedule.
10. Paper Strip Christmas Trees
Let’s be honest, sometimes our kids just need something simple that keeps them busy and teaches them a skill at the same time. Paper strip Christmas trees are perfect for this. It’s budget-friendly, uses scrap paper, and sneaks in a little fine motor practice while still feeling festive.
Supplies You Need:
Colored paper or scrap paper
Markers or crayons
How to Make It:
Cut strips of paper in different lengths (short to long).
Starting from the shortest strip, glue them in layers to a base triangle shape on another piece of paper.
Continue layering strips, slightly overlapping, until the triangle is filled out and tree-like.
Decorate with markers, sequins, or stickers to create ornaments.
Add a small star at the top with a yellow paper cutout or sticker.
Why Kids Love It:
They get to cut, glue, and create their own mini tree masterpiece. Encourages color coordination and creativity. Works beautifully for holiday cards or wall art displays
💡 Pro Tip: Use leftover paper from other crafts—this is a great way to repurpose scraps while keeping your kids engaged. Parents will also love linking to an affiliate pack of colored paper or sticker sets to make the project even easier.
11. DIY Cinnamon Ornaments
Nothing says “holiday vibes” quite like the warm, spicy scent of cinnamon wafting through your home. These DIY cinnamon ornaments are not only budget-friendly, but they also make adorable keepsakes or gifts for family and friends. Plus, the kids get to help knead, shape, and decorate—total hands-on holiday fun!
Supplies You Need:
1 cup ground cinnamon
1/4 cup applesauce
Cookie cutters (holiday shapes!)
Ribbon or twine for hanging
How to Make It:
Mix the cinnamon and applesauce in a bowl until it forms a soft dough.
Roll out the dough on parchment paper (1/4-inch thick).
Use cookie cutters to cut out festive shapes—stars, trees, snowmen!
Make a small hole at the top with a straw for hanging.
Bake at 200°F for 2–3 hours or air dry overnight until firm.
Once cooled, add ribbon or twine and decorate with paint or glitter if desired.
Why Kids Love It:
Kneading the dough is like edible playdough fun. Kids can personalize each ornament, making it truly theirs. The smell of cinnamon makes the craft feel extra cozy and magical.
12. Coffee Filter Snowflakes
Do you remember making snowflakes in school and feeling like a tiny holiday artist? Let’s bring that nostalgia home without the mess or cost. Coffee filter snowflakes are easy, inexpensive, and endlessly fun—perfect for toddlers, preschoolers, and even big kids who love to fold, cut, and create.
Supplies You Need:
Coffee filters (any size)
Optional: washable markers or watercolors
How to Make It:
Flatten a coffee filter and fold it into a triangle.
Fold it again a couple more times (like a tiny pizza slice!)
Cut small shapes along the edges—triangles, hearts, diamonds, or squiggles.
Unfold your snowflake to reveal a unique design.
Optional: Color with markers or watercolors for extra flair.
Hang from a string in windows, doorways, or on your Christmas tree.
Why Kids Love It:
Mess-free folding and cutting keeps kids engaged without stress. Each snowflake is one-of-a-kind, boosting creativity and pride. Encourages fine motor skill development and pattern recognition

13. Yarn-Wrapped Trees
If your kids love hands-on crafts that feel like real holiday magic, they are going to adore making these yarn-wrapped trees. It’s creative, colorful, and perfect for building fine motor skills—plus, it looks adorable on a shelf or mantel.
Supplies You Need:
Glue or double-sided tape
Optional: mini pom-poms or beads for decoration
How to Make It:
Start at the base of your cone and secure the yarn with a dab of glue or tape.
Wrap the yarn all the way around the cone, changing colors if you like, to create stripes or a festive pattern.
Once the cone is fully wrapped, tuck the end into the last row with glue.
Optional: Add mini pom-poms, beads, or tiny bells to decorate.
Why Kids Love It:
Wrapping yarn is so satisfying and tactile—perfect for keeping hands busy. Each tree can be customized with colors and decorations, encouraging creativity. Develops hand-eye coordination and fine motor skills
💡 Pro Tip: Use this craft as a mini holiday centerpiece or a festive DIY gift.
14. Pipe Cleaner Candy Canes
If you’re looking for a super simple, mess-free craft that toddlers and preschoolers can do mostly on their own, these pipe cleaner candy canes are a holiday lifesaver. They’re quick, fun, and perfect for little hands just learning to twist and shape.
Supplies You Need:
Optional: small beads for extra sparkle
Ribbon (to hang on the tree or for gifts)
How to Make It:
Take a red and a white pipe cleaner and twist them together to make a candy cane stripe pattern.
Shape the twisted pipe cleaners into the classic candy cane curve.
Optional: Slide beads onto the pipe cleaners for a fun, colorful touch.
Tie a small ribbon at the top if you want to hang it as an ornament.
Why Kids Love It:
Twisting pipe cleaners is so satisfying for little fingers. Creates a cute, holiday-ready decoration that feels like a real accomplishment. Encourages creativity and pre-writing skills
💡 Pro Tip: Keep a stash of pipe cleaners handy, they’re inexpensive, reusable, and perfect for multiple crafts. Pair with beads or ribbons to turn this into a giftable little project for grandparents or teachers.
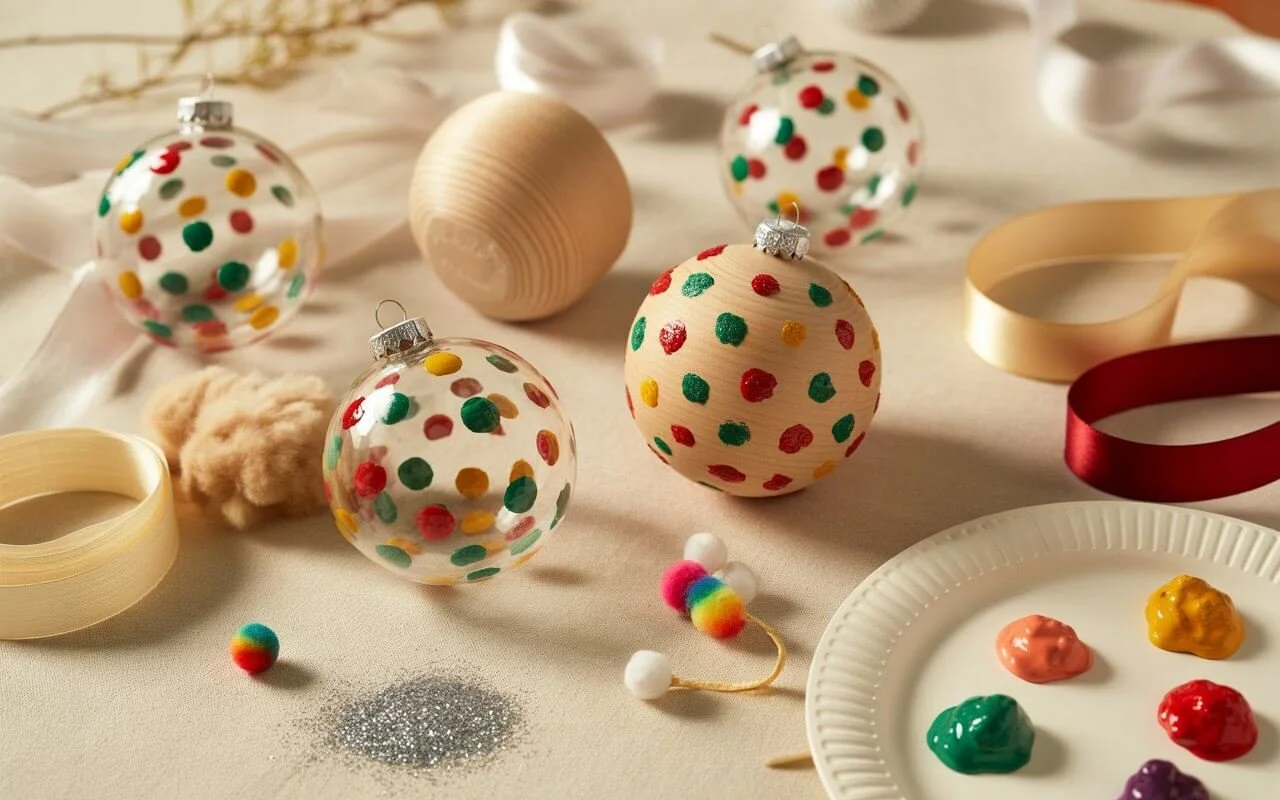
15. Pom-Pom Painted Ornaments
Sometimes you just want a craft that feels creative but won’t leave you scrubbing paint off the table for hours. Pom-pom painted ornaments are perfect, they’re mess-controlled, festive, and let kids explore their inner artist.
Supplies You Need:
Small pom-poms (or cotton balls)
Paper plates for dipping
Optional: glitter, ribbon for hanging
How to Make It:
Pour a small amount of paint onto a plate.
Let your child dip the pom-poms into the paint.
Dab or roll the pom-poms on the ornament to create fun, colorful patterns.
Optional: sprinkle glitter while the paint is still wet for extra sparkle.
Let dry and tie a ribbon to hang on the tree.
Why Kids Love It:
Pom-poms are easy to handle and fun to dab. Kids get to see their artwork come to life quickly. Encourages creativity, color exploration, and hand-eye coordination
💡 Pro Tip: Use washable paint and cover your surface with newspaper or an old placemat. This craft looks like a Pinterest masterpiece without the Pinterest-level stress!
16. Craft Stick Snowflakes
Mama, let’s be honest, sometimes we want decor that feels magical but is still totally doable with kids. Craft stick snowflakes are a classic, festive, and budget-friendly way to let little hands get creative while making something they can proudly hang on the tree.
Supplies You Need:
Popsicle sticks (or craft sticks)
Glue (white or tacky)
Washable paint or spray paint
String or ribbon for hanging
How to Make It:
Arrange 3–5 popsicle sticks in a snowflake shape (cross them in the center and glue).
Let the kids paint the sticks in colors they love—white, silver, or even rainbow!
While the paint is wet, sprinkle glitter or add jewels for that sparkle effect.
Once dry, attach a string or ribbon so they can hang their snowflake anywhere in the house.
Why Kids Love It:
They get to build something in 3D, which feels magical. Glitter + paint = instant festive fun. Promotes fine motor skills and creativity
💡 Pro Tip: For less mess, use a shallow tray to catch paint drips or glitter. Kids love the sparkly results, and you love the stress-free cleanup.
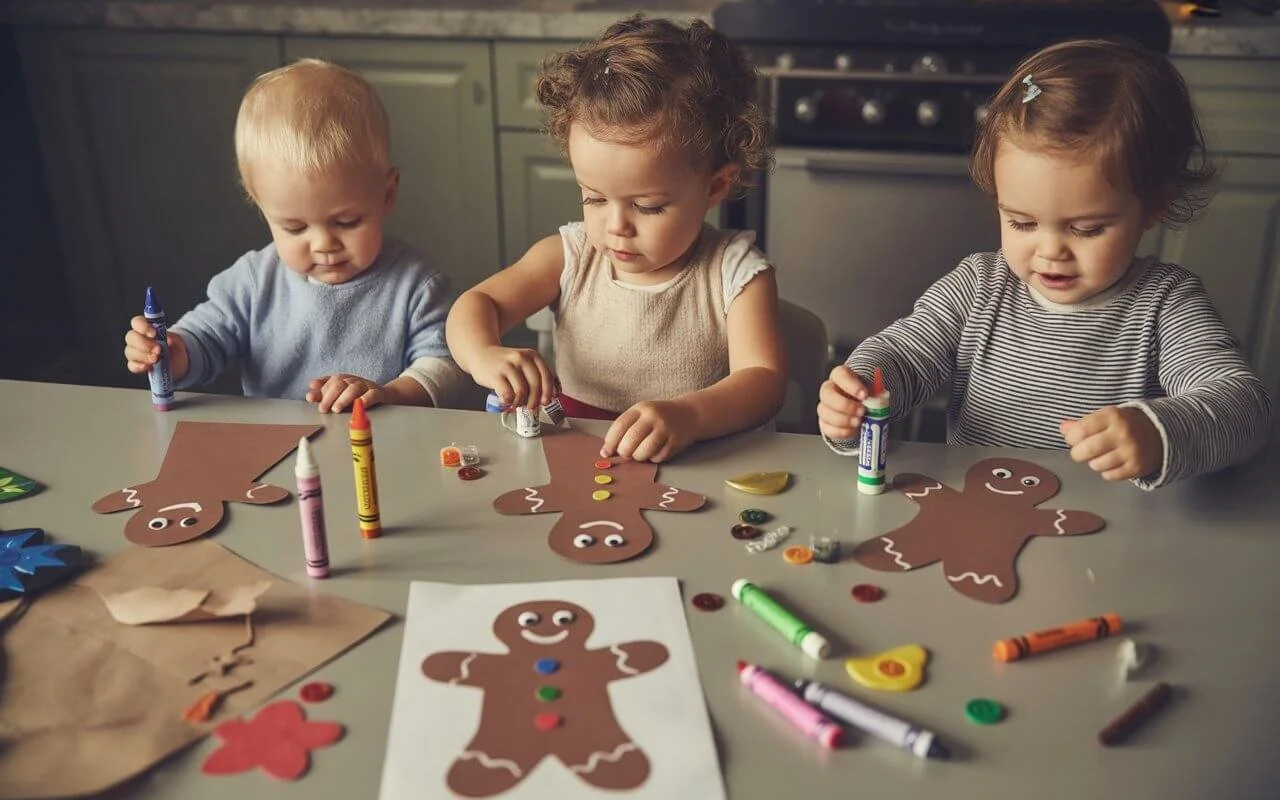
17. Gingerbread Man Paper Craft
If your kids love all things holiday cookies but you don’t want the mess of actual baking, this Gingerbread Man Paper Craft is your new best friend. It’s simple, budget-friendly, and perfect for rainy days, classroom groups, or quiet time at home.
Supplies You Need:
Cardstock or construction paper (brown works best)
How to Make It:
Print or draw a Gingerbread Man template on cardstock.
Let your child color, decorate, and personalize their gingerbread friend.
Cut out the gingerbread shape carefully.
Add googly eyes, buttons, or stickers for extra flair.
Display around the house or hang with a string for DIY holiday garlands.
Why Kids Love It:
They get to design their own festive character. Encourages creativity and fine motor skills. Feels like holiday baking without the sugar
💡 Pro Tip: Print multiple templates so your kids can make an entire gingerbread family.
18. Christmas Slime
Alright, mama, if you want a craft that’s fun, festive, and downright mesmerizing, Christmas slime is your new holiday hack. Yes, it can be messy, but the mess is part of the magic, and your kids will be totally obsessed.
Supplies You Need:
Clear or white glue
Food coloring (green for Grinch, red & white for Candy Cane, blue for snow slime)
Glitter or foam beads for sparkle
Mixing bowls and spoons
How to Make It:
Pour glue into a bowl and add a few drops of food coloring.
Sprinkle in baking soda and mix well.
Add contact solution gradually until slime forms.
Knead with hands for perfect stretchy texture.
Add glitter, foam beads, or festive sprinkles for holiday flair.
Why Kids Love It:
The stretch, squish, and poke factor is addictive. Encourages sensory exploration. Can create multiple holiday themes (Grinch, Candy Cane, Snow)
💡 Pro Tip: Pre-packaged holiday slime kits are perfect for moms who want the slime experience without measuring all the ingredients. Bonus: it keeps kids busy while you prep dinner or sip your coffee in peace ☕🎅
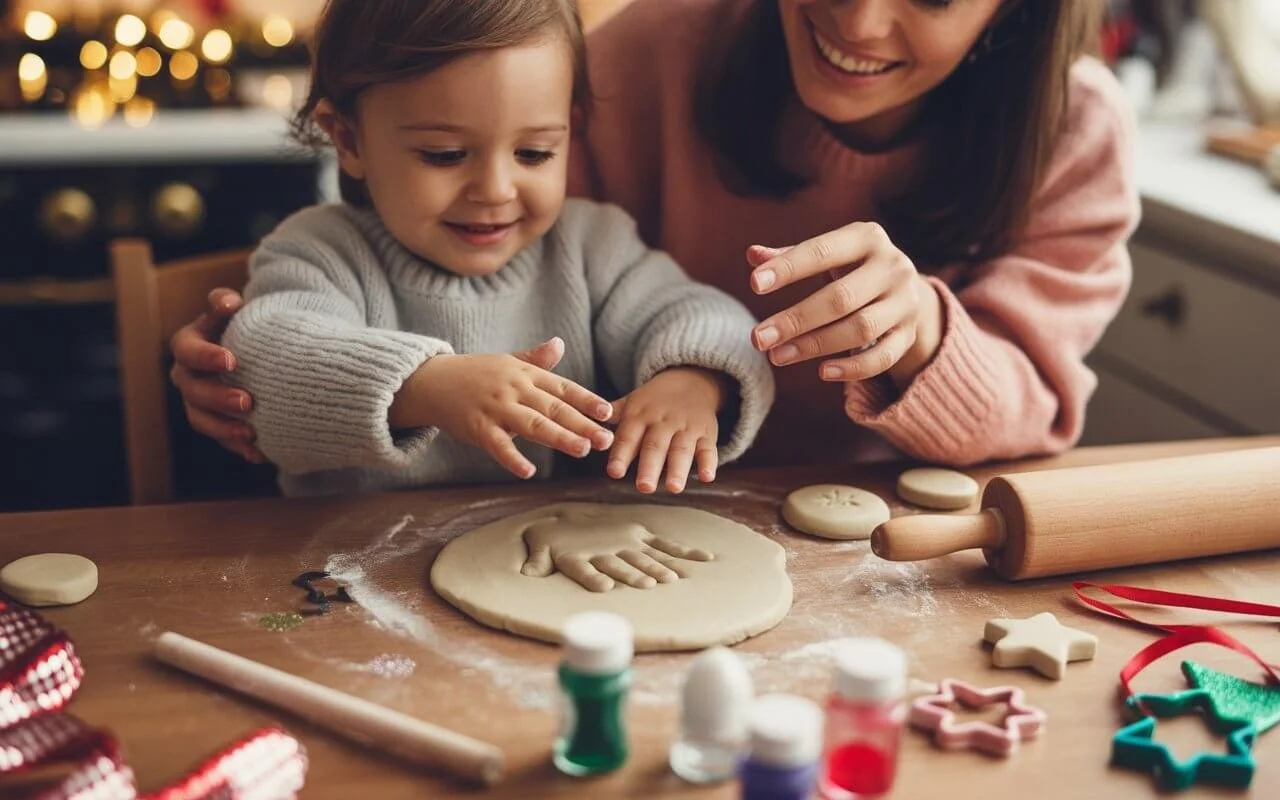
19. Salt Dough Handprint Ornaments
Mama, let’s get real—nothing tugs at your heartstrings like a tiny handprint captured forever. These salt dough ornaments are not only super easy, but they’re personal, sentimental, and budget-friendly. Plus, they make the perfect gift for grandparents, aunts, or your holiday tree.
Supplies You Need:
1 cup flour
1/2 cup salt
1/2 cup water
Cookie cutters or a knife for shapes
Straw (for holes to hang)
Paints, markers, or glitter for decorating
How to Make It:
Mix flour, salt, and water until a dough forms.
Roll out to about 1/4 inch thick.
Use cookie cutters or shape by hand.
Press your child’s hand into the dough for that perfect imprint.
Use a straw to poke a hole for hanging.
Bake at 250°F for 2 hours (or until fully hard).
Paint, decorate, and thread ribbon through the hole.
Why Kids Love It:
They get to see their handprint immortalized. Fun for painting and decorating. Creates a memory that lasts forever.
💡 Pro Tip: You can grab these inexpensive paint sets, glitter packs, or ribbon bundles to recreate the magic without the guesswork. Bonus: You get a keepsake ornament AND a fun activity that feels special.
20. Recycled Cardboard Christmas Village
So, let’s talk fun, creativity, and using what you already have. This recycled cardboard Christmas village is perfect for keeping kids entertained while giving your holiday decor a DIY twist. Bonus points: it’s eco-friendly, budget-conscious, and encourages imaginative play.
Supplies You Need:
Small cardboard boxes (think Amazon boxes, cereal boxes, or packaging scraps)
Optional: small embellishments like glitter, cotton for “snow,” or stickers
How to Make It:
Gather small boxes and cut them into house shapes—roofs, chimneys, or even little shops.
Use paint pens or markers to add windows, doors, and festive decorations.
Arrange your boxes into a mini village layout—stack, line up, or create little streets.
Add cotton for snow and sprinkle glitter for sparkle.
Let your kids customize each building for a unique, personal touch.
Why Kids Love It:
They get to design their own town. Encourages creativity and imaginative storytelling. Perfect for holiday role-play and decorating shelves or mantels
💡 Pro Tip: Here are some paint pens, mini embellishment packs, or glitter sets so you can easily recreate your adorable Christmas village without hunting for supplies.

21. Fingerprint Christmas Lights Art
Mama, if you love hands-on crafts that don’t turn your house into a disaster zone, this one is for you. Fingerprint Christmas lights art is simple, cute, and perfect for all ages—even the tiniest helpers can join in!
Supplies You Need:
Washable paint in bright colors (red, green, yellow, blue)
Paper (white or colored cardstock)
Optional: frame for displaying the masterpiece
How to Make It:
Draw a string of lights using a black marker on your paper.
Have your child dip their fingertips into paint and press along the drawn string to create “bulbs.”
Let each print dry completely.
Add decorative touches like little glitter dots or smiley faces on the lights if desired.
Frame or hang the artwork for a personalized holiday display.
Why Kids Love It:
They get to press, stamp, and create with their own fingers. Super easy and low prep—you don’t need brushes or fancy tools. Turns into a keepsake piece for your holiday decor or gifts
22. DIY Reindeer Puppets
Alright, mama, if your kids love puppets and storytelling, this craft is an absolute winner. It’s simple, budget-friendly, and keeps little hands busy while sparking imaginative play.
Supplies You Need:
Brown paper bags or cardstock (for the reindeer face)
Optional: small bells or craft foam for antlers
How to Make It:
Cut out a reindeer face from brown paper or cardstock.
Glue it to a popsicle stick (or tape inside a brown paper bag for a full puppet).
Add googly eyes and a red nose for Rudolph magic.
Draw or attach antlers with cardstock, pipe cleaners, or foam.
Let it dry completely, then start the puppet show!
Why Kids Love It:
They can play pretend right after making it. Combines crafting + imaginative storytelling. Easy to create multiples for siblings or friends.
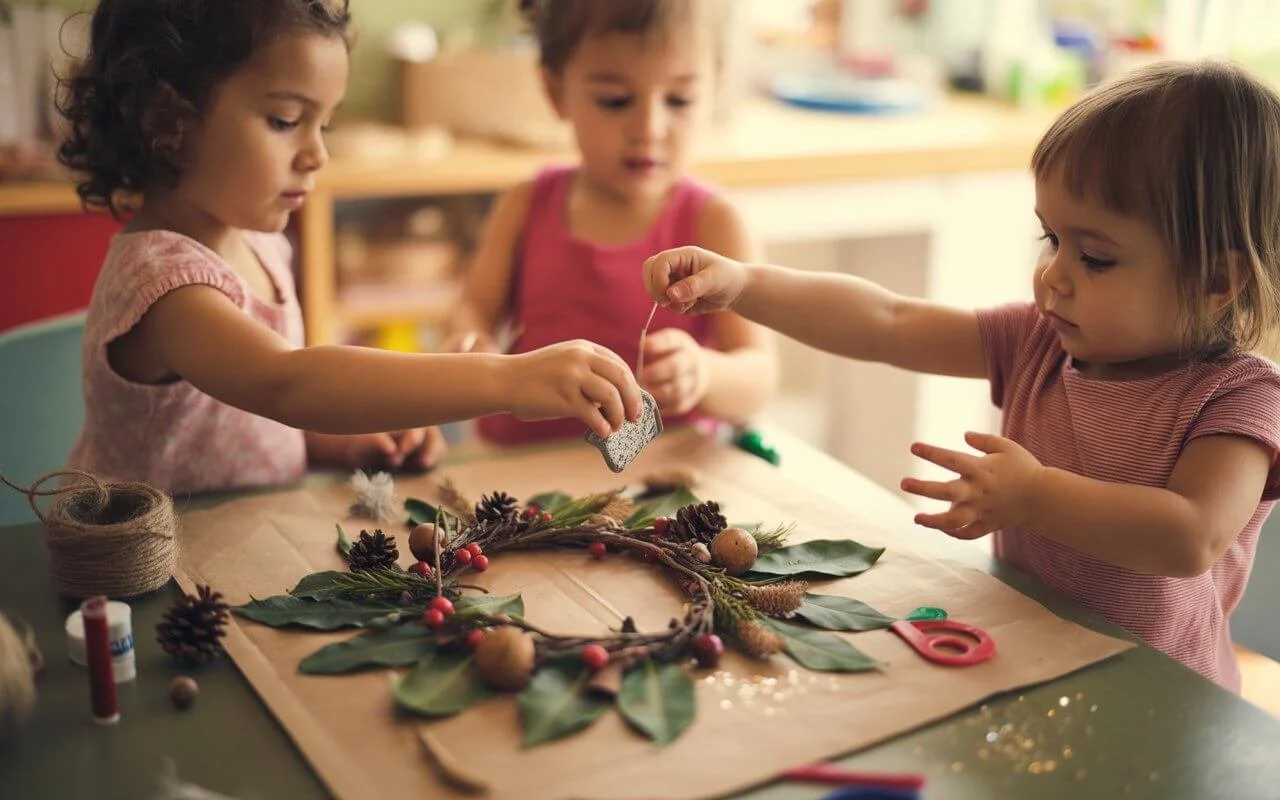
23. Christmas Nature Walk Ornament 🍂🎄
Mama, this one is for all the little explorers out there! Take your kids on a short nature walk, and turn your finds into a festive craft that brings the outdoors inside. It’s perfect for a calm, hands-on holiday activity that’s both creative and seasonal.
Supplies You Need:
Leaves, twigs, berries, or small pinecones collected from a walk
Glue or a hot glue gun (with supervision)
Optional: glitter, paint, or small ornaments for extra sparkle
How to Make It:
Arrange your natural finds into a festive shape — think a star, wreath, or mini tree.
Glue everything carefully onto a sturdy base (cardboard works perfectly).
Add twine or string to hang it on the tree or near a window.
Optional: sprinkle a little glitter or add paint accents for a magical touch.
Why Kids Love It:
Combines exploration + crafting, which makes them feel like tiny adventurers. Encourages nature appreciation and mindfulness. Produces a beautiful keepsake ornament that will last year after year
💡 Pro Tip: It’s simple, budget-friendly, and gives kids a sense of accomplishment seeing their natural treasures turned into decor!
24. Button Christmas Tree Craft 🎨🌲
Mama, if you’re looking for a craft that’s perfect for tiny fingers and fine motor practice, this one is a winner. Kids get to sort colors, practice placement, and create something proudly festive — all with just a few budget-friendly supplies.
Supplies You Need:
Cardstock or construction paper
Assorted buttons (bright, colorful, or holiday-themed)
Glue (school glue works just fine)
How to Make It:
Draw a simple triangle tree shape on your cardstock as a guide.
Have your child sort buttons by color or size — this is already a sneaky skill-builder!
Glue the buttons onto the triangle to create a festive, textured tree.
Optional: add a star sticker or small pom-pom on top for extra flair.
Why Kids Love It:
Hands-on and colorful, it keeps them engaged for longer periods. Encourages fine motor skills and pattern recognition. Creates a festive piece of art that can hang on the fridge or become a holiday card
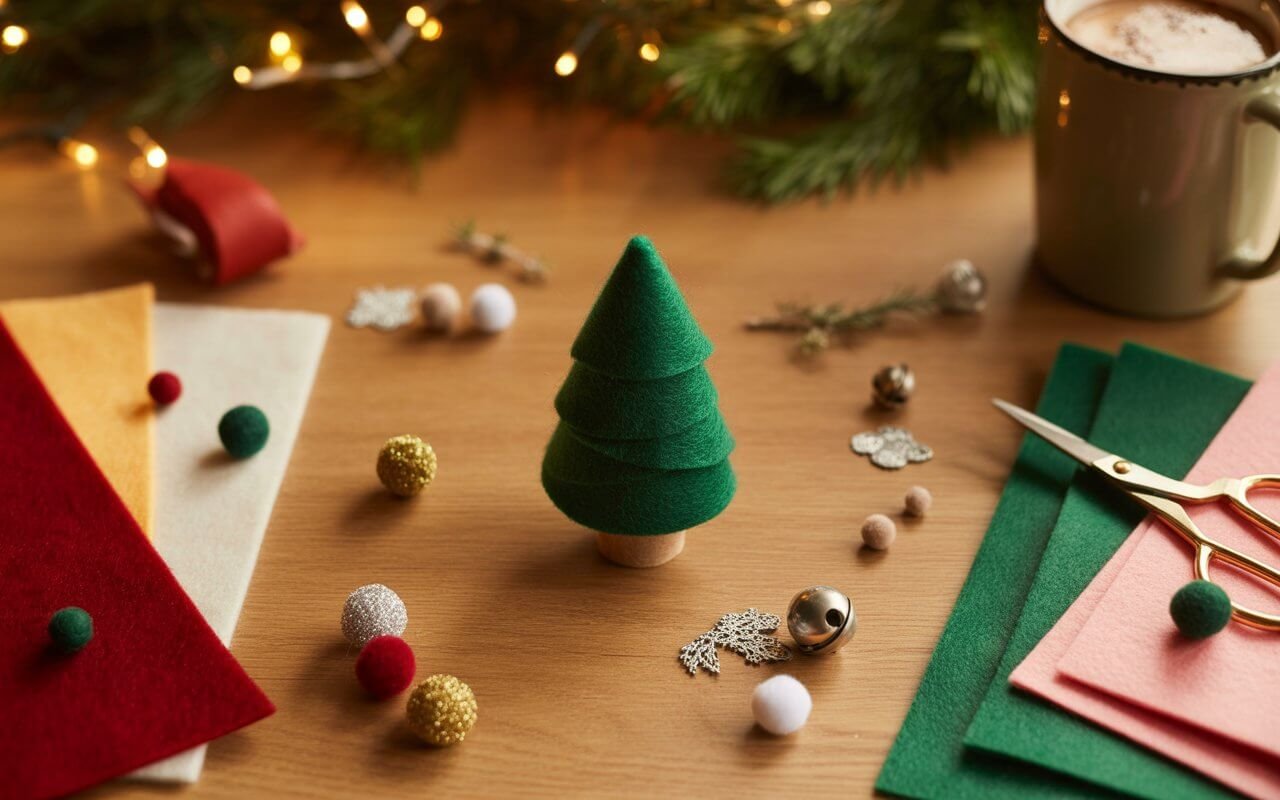
25. Felt Christmas Tree
The simplest materials create the most magical memories. This mini felt Christmas tree craft is perfect for hands-on learning, little fingers, and cozy indoor fun, without a ton of mess.
Supplies You Need:
Small felt sheets (green for the tree, various colors for decorations)
Scissors (safety scissors for little ones)
Glue or fabric glue
Optional: mini pom-poms, sequins, or stickers
Cardboard base or small craft cone
How to Make It:
Cut a triangle shape from the green felt or use a mini craft cone as your base.
Let your child cut or glue decorations from the other felt sheets onto the tree.
Add pom-poms, sequins, or stickers for ornaments.
Glue the tree to a small cardboard base or leave it as a flat decorative piece.
Display proudly on a shelf, desk, or as part of a festive table centerpiece!
Why Kids Love It:
Hands-on, tactile, and colorful — keeps little fingers busy. Great for creative expression and learning shapes. Perfect keepsake craft that can be used year after year
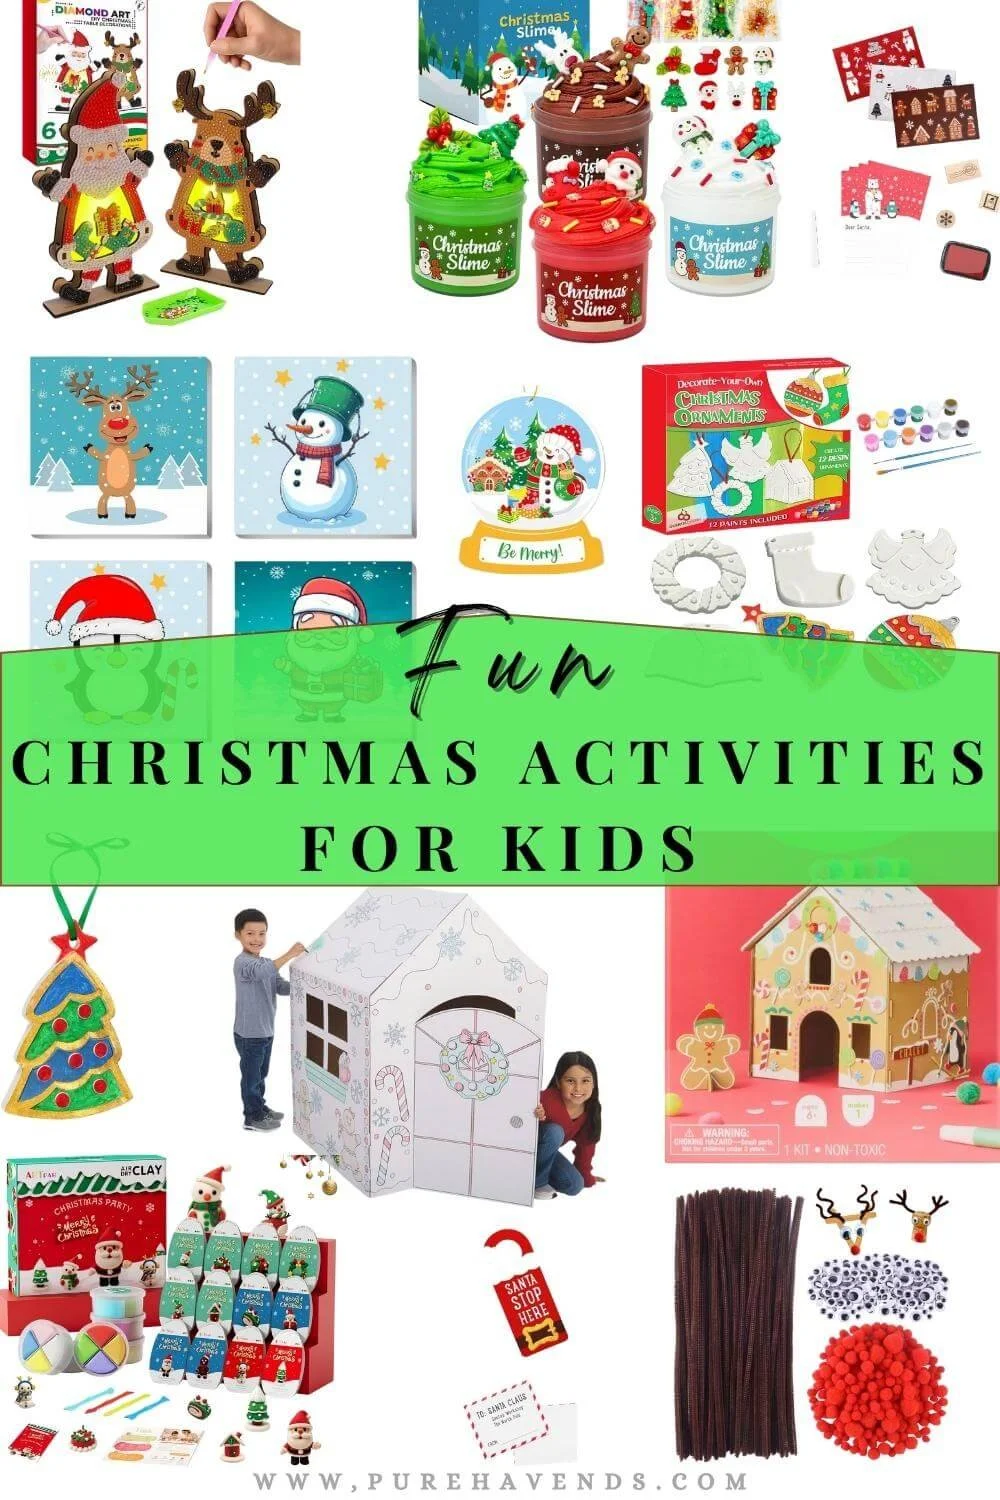
Easy no-prep Craft kits for kids
Let’s Conclude
The holiday season can feel like a juggling act, keeping the kids happy, checking off your to-do list, and trying to sneak in a cup of coffee without it going cold. That’s exactly why I love these 25 easy Christmas crafts for kids. They’re budget-friendly, mostly mess-free, and can be done in under 30 minutes, giving you those small moments of peace while still making magical memories.
Whether it’s stamping a fork-painted wreath, building a tiny snowman out of cups, or painting fingerprint lights, every craft brings a little sparkle of joy without adding stress to your day.
Want to make it even easier?
I know some days we just don’t have the time to hunt down all the supplies. That’s why I’ve curated a ready-to-go crafts kits and fun family activities you can all do together. Click here for the list.